


Share this
by Taryn Hardes on Tue, Mar 18, 2014 @ 14:03 PM
Using a new tool can be intimidating. Here, we have tips and a video on how to successfully bend tubing using the Swagelok hand tube bender.
 |
|
|
A hand tube bender could be the solution for all your tube bending needs. Download the Hand Tube Bender Manual for more details. |
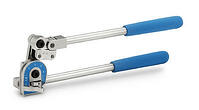
For consistent, high quality bends in tubing made from most materials, all you need is a Swagelok hand tube bender. It bends tubing from 1/8 inch to 1/2 inch in a variety of wall thicknesses. This hand tube bender can be used to form single, offset and other bends in tubing that is fully annealed, high-quality seamless or welded and drawn.
Suppose you want to make a 90-degree bend four inches from the end of the tube, followed by a 180-degree bend, with four inches between bends. Here's all that you need:
* A bender corresponding to the tubing size
* A piece of tubing
* A marker
* A protractor (optional)
Easy steps
1. For the 90-degree bend, first mark the end of the tube from which you are beginning the measurements. Measure four inches from that reference mark, and make a mark to indicate the first bend length.
2. Swing the short handle up so that it is above the bender die.
3. Open the tube latch.
4. Place the tube in the groove of the bender die, with the reference mark to the left of the tube latch.
5. Close the tube latch over the tube. This restricts movement of the tube, but still allows for additional alignment.
6. Carefully lower the short handle until the roll dies rest gently on the tube, while keeping the link straight and parallel to the long handle. If the link is not straight and parallel to the long handle, you may get some premature bending.
7. Align the zero on the roll support with the zero on the name plate, with the reference end of the tube to the left of the latch.
8. Align the bend mark with the mark on the roll support that corresponds to the bend angle. In this example, the L corresponds to 90 degrees.
9. Slowly push the short handle down until the zero on the roll support reaches the 90-degree mark on the name plate. Notice that the tubing will spring back slightly after the bend has been completed. To adjust for spring-back, lift the bender handle and repeat the alignment of the tubing with the roll support, then measure the bend with the bender scale. Bend an extra two or three degrees as needed.
10. After completing the bend, swing the short handle up and away from the tube.
11. Pull the tube latch off the tube.
12. Remove the tube from the bender groove.
13. Measure the bent tube against the protractor or some other object of a known angle to make sure you got it right.
One more time
For the 180-degree bend, you'll follow the same basic procedure, with a couple of extra steps.
Make a mark four inches from the vertex of the 90-degree bend, then draw a line through that mark to indicate the outside or "heel" of the 180-degree bend. This will help you make sure you bend the tube in the direction you want. Follow steps 3 through 8 as listed above. At step 9, after you have reached the 90-degree mark, loosen the short handle from the clevis until the short handle will swing without moving the roll support.
Swing the short handle up until it is slightly above perpendicular to the long handle. Now retighten the short handle. This will provide continuous right-angle leverage for the rest of the bend. Continue the bend until the zero on the roll support reaches the 180-degree mark on the name plate. After completing the bend, swing the short handle away, pausing when the zero on the roll support reaches approximately 90 degrees. Loosen the short handle and move it until it's parallel with the long handle, then retighten the short handle.
Move the short handle up and away from the tube, pull the tube latch off the tube, and remove the tube from the bender groove. You can verify the bend angles using a template or some other object with a known angle.
If that seems like a lot of steps, it may look a bit easier if you watch someone go through them. Take a look at the Swagelok How-To video here.
If you want to immerse yourself in the subject, download Swagelok's Hand Tube Bender Manual. It dives deep into some of the finer points of tube bending, such as "gain" calculations. That's the adjustment you need to make to compensate for the fact that the length of tubing in a radiused bend is always less than if the bend were a sharp 90 degrees. The manual has a full table of fractional adjustments depending on the angle of the bend and the outside diameter of the tube.